
Tartalom
Bevezető
Ezekben a meleg időszakokban nem csak minket, de számítógépeinket, laptopjainkat is megviseli a forróság. Ilyenkor fokozottabban kell figyelnünk gépünkre, hogy megfelelő-e a hűtése, nincs-e benne sok lerakódott por ami gátolja a hardverek körüli légáramlást, stb. Magasabb hőmérsékleten a ventilátorok nagyobb fordulatra állnak be, ami még több hőt is termel, és emellett a gépbe jutó por mennyisége is tovább növekszik. A processzor pedig lejjebb veszi a teljesítményét, hogy megpróbáljon visszahűlni az optimális hőmérsékleti tartományába. Ilyenkor a gép összteljesítménye csökken, valamint egy-egy nagyobb megterhelés akár hardveres meghibásodáshoz is vezethet, ezért célszerű időnként ránézni a gépben lévő eszközök hőmérsékleti adataira.
Ebben a leírásban feltelepítjük az lm-sensors nevű programot, amivel először felderítjük a számítógépben rendelkezésre álló hőmérsékleti szenzorokat, azután pedig bármikor lekérdezhetjük azoknak az aktuális adatait. Majd feltelepítjük a hddtemp nevű programot is, amivel pedig külön kiolvashatjuk a merevlemezeinkben lévő szenzorok hőmérsékleti értékeit is. Így a legmelegebb időszakokban rendszeresen figyelhetjük gépünk adatait, hogy optimálisan tudjuk használni azt.
Hardverek hőmérsékletének mérése az lm-sensors programmal
Telepítés
Telepítsük root-ként az lm-sensors csomagot az alábbi apt-get paranccsal:
apt-get install lm-sensors
Szenzorok felderítése
Ezután futtassuk le a program szenzor detektáló parancsát:
sensors-detect
Ekkor elindul egy a kereső, ami felderíti a számítógépben lévő hőmérsékleti szenzorokat. Ez minden alaplap esetén más és más eredményt ad. Közben rákérdez minden fázisban, hogy szeretnénk-e futtatni az adott érzékelő detektálását. Ezekre válaszoljunk mindegyik kérdésnél "yes" -el.
Nálam ennek a kimenete így néz ki:
# sensors-detect revision 6284 (2015-05-31 14:00:33 +0200)
# Board: Gigabyte Technology Co., Ltd. B75M-D3H
# Kernel: 4.9.0-7-amd64 x86_64
# Processor: Intel(R) Core(TM) i7-3770 CPU @ 3.40GHz (6/58/9)

This program will help you determine which kernel modules you need
to load to use lm_sensors most effectively. It is generally safe
and recommended to accept the default answers to all questions,
unless you know what you're doing.

Some south bridges, CPUs or memory controllers contain embedded sensors.
Do you want to scan for them? This is totally safe. (YES/no): yes
Module cpuid loaded successfully.
Silicon Integrated Systems SIS5595...                       No
VIA VT82C686 Integrated Sensors...                          No
VIA VT8231 Integrated Sensors...                            No
AMD K8 thermal sensors...                                   No
AMD Family 10h thermal sensors...                           No
AMD Family 11h thermal sensors...                           No
AMD Family 12h and 14h thermal sensors...                   No
AMD Family 15h thermal sensors...                           No
AMD Family 16h thermal sensors...                           No
AMD Family 15h power sensors...                             No
AMD Family 16h power sensors...                             No
Intel digital thermal sensor...                             Success!
    (driver `coretemp')
Intel AMB FB-DIMM thermal sensor...                         No
Intel 5500/5520/X58 thermal sensor...                       No
VIA C7 thermal sensor...                                    No
VIA Nano thermal sensor...                                  No

Some Super I/O chips contain embedded sensors. We have to write to
standard I/O ports to probe them. This is usually safe.
Do you want to scan for Super I/O sensors? (YES/no): yes
Probing for Super-I/O at 0x2e/0x2f
Trying family `National Semiconductor/ITE'...               No
Trying family `SMSC'...                                     No
Trying family `VIA/Winbond/Nuvoton/Fintek'...               No
Trying family `ITE'...                                      Yes
Found `ITE IT8728F Super IO Sensors'                        Success!
    (address 0xa30, driver `it87')
Probing for Super-I/O at 0x4e/0x4f
Trying family `National Semiconductor/ITE'...               No
Trying family `SMSC'...                                     No
Trying family `VIA/Winbond/Nuvoton/Fintek'...               No
Trying family `ITE'...                                      No

Some systems (mainly servers) implement IPMI, a set of common interfaces
through which system health data may be retrieved, amongst other things.
We first try to get the information from SMBIOS. If we don't find it
there, we have to read from arbitrary I/O ports to probe for such
interfaces. This is normally safe. Do you want to scan for IPMI
interfaces? (YES/no): yes
Probing for `IPMI BMC KCS' at 0xca0...                      No
Probing for `IPMI BMC SMIC' at 0xca8...                     No

Some hardware monitoring chips are accessible through the ISA I/O ports.
We have to write to arbitrary I/O ports to probe them. This is usually
safe though. Yes, you do have ISA I/O ports even if you do not have any
ISA slots! Do you want to scan the ISA I/O ports? (yes/NO): yes
Probing for `National Semiconductor LM78' at 0x290...       No
Probing for `National Semiconductor LM79' at 0x290...       No
Probing for `Winbond W83781D' at 0x290...                   No
Probing for `Winbond W83782D' at 0x290...                   No

Lastly, we can probe the I2C/SMBus adapters for connected hardware
monitoring devices. This is the most risky part, and while it works
reasonably well on most systems, it has been reported to cause trouble
on some systems.
Do you want to probe the I2C/SMBus adapters now? (YES/no): yes
Using driver `i2c-i801' for device 0000:00:1f.3: Intel Panther Point (PCH)
Module i2c-dev loaded successfully.

Next adapter: SMBus I801 adapter at f040 (i2c-0)
Do you want to scan it? (yes/NO/selectively): yes
Client found at address 0x50
Probing for `Analog Devices ADM1033'...                     No
Probing for `Analog Devices ADM1034'...                     No
Probing for `SPD EEPROM'...                                 Yes
    (confidence 8, not a hardware monitoring chip)
Probing for `EDID EEPROM'...                                No
Client found at address 0x51
Probing for `Analog Devices ADM1033'...                     No
Probing for `Analog Devices ADM1034'...                     No
Probing for `SPD EEPROM'...                                 Yes
    (confidence 8, not a hardware monitoring chip)
Client found at address 0x52
Probing for `Analog Devices ADM1033'...                     No
Probing for `Analog Devices ADM1034'...                     No
Probing for `SPD EEPROM'...                                 Yes
    (confidence 8, not a hardware monitoring chip)
Client found at address 0x53
Probing for `Analog Devices ADM1033'...                     No
Probing for `Analog Devices ADM1034'...                     No
Probing for `SPD EEPROM'...                                 Yes
    (confidence 8, not a hardware monitoring chip)

Next adapter: i915 gmbus ssc (i2c-1)
Do you want to scan it? (yes/NO/selectively): yes

Next adapter: i915 gmbus vga (i2c-2)
Do you want to scan it? (yes/NO/selectively): yes

Next adapter: i915 gmbus panel (i2c-3)
Do you want to scan it? (yes/NO/selectively): yes

Next adapter: i915 gmbus dpc (i2c-4)
Do you want to scan it? (yes/NO/selectively): yes

Next adapter: i915 gmbus dpb (i2c-5)
Do you want to scan it? (yes/NO/selectively): yes

Next adapter: i915 gmbus dpd (i2c-6)
Do you want to scan it? (yes/NO/selectively): yes

Next adapter: DPDDC-B (i2c-7)
Do you want to scan it? (yes/NO/selectively): yes

Next adapter: DPDDC-D (i2c-8)
Do you want to scan it? (yes/NO/selectively): yes


Now follows a summary of the probes I have just done.
Just press ENTER to continue:

Driver `it87':
  * ISA bus, address 0xa30
    Chip `ITE IT8728F Super IO Sensors' (confidence: 9)

Driver `coretemp':
  * Chip `Intel digital thermal sensor' (confidence: 9)

To load everything that is needed, add this to /etc/modules:
#----cut here----
# Chip drivers
coretemp
it87
#----cut here----
If you have some drivers built into your kernel, the list above will
contain too many modules. Skip the appropriate ones!

Do you want to add these lines automatically to /etc/modules? (yes/NO) yes
Successful!

Monitoring programs won't work until the needed modules are
loaded. You may want to run '/etc/init.d/kmod start'
to load them.

Unloading i2c-dev... OK
Unloading cpuid... OK
Tehát elég sok helyen rákérdez, mindenhol válaszoljunk yes-el. Mégegyszer ismétlem, hogy ahány gép, annyiféle hőmérsékleti érzékelő, így annyi féle kimenetet produkál a program. Így ezt csak hasonlításképpen fussuk át.
Ezután indítsuk újra a kmod szolgáltatást (szintén root-ként):
service kmod start
Hőmérsékleti adatok kiolvasása
Ha idáig eljutottunk, akkor innentől már bármikor kiolvashatjuk a hőmérők adatait a sensors paranccsal, amit már sima felhasználóként is futtathatunk:
sensors
Nálam a kimenet ebben a pillanatban:
it8728-isa-0a30
Adapter: ISA adapter
in0:          +1.07 V  (min =  +0.00 V, max =  +3.06 V)
in1:          +1.98 V  (min =  +0.00 V, max =  +3.06 V)
in2:          +2.03 V  (min =  +0.00 V, max =  +3.06 V)
in3:          +1.94 V  (min =  +0.00 V, max =  +3.06 V)
in4:          +2.22 V  (min =  +0.00 V, max =  +3.06 V)
in5:          +0.94 V  (min =  +0.00 V, max =  +3.06 V)
in6:          +1.51 V  (min =  +0.00 V, max =  +3.06 V)
3VSB:         +3.36 V  (min =  +0.00 V, max =  +6.12 V)
Vbat:         +3.29 V
fan1:        1674 RPM  (min =    0 RPM)
fan2:        1157 RPM  (min =    0 RPM)
fan3:           0 RPM  (min =    0 RPM)
fan4:           0 RPM  (min =    0 RPM)
fan5:           0 RPM  (min =    0 RPM)
temp1:        +37.0°C  (low  = +127.0°C, high = +127.0°C)  sensor = thermistor
temp2:       +127.0°C  (low  = +127.0°C, high = +127.0°C)  sensor = thermistor
temp3:        +40.0°C  (low  = +127.0°C, high = +127.0°C)  sensor = Intel PECI
intrusion0:  ALARM

acpitz-virtual-0
Adapter: Virtual device
temp1:        +27.8°C  (crit = +106.0°C)
temp2:        +29.8°C  (crit = +106.0°C)

coretemp-isa-0000
Adapter: ISA adapter
Physical id 0:  +50.0°C  (high = +85.0°C, crit = +105.0°C)
Core 0:         +48.0°C  (high = +85.0°C, crit = +105.0°C)
Core 1:         +50.0°C  (high = +85.0°C, crit = +105.0°C)
Core 2:         +48.0°C  (high = +85.0°C, crit = +105.0°C)
Core 3:         +46.0°C  (high = +85.0°C, crit = +105.0°C)
Itt láthatunk néhány hőmérsékleti adatot és egyebet. A különböző szenzorokról itt olvashatunk bővebben.
Érdekességképpen lefuttattam a szerveren is, ami rendes szerverteremben van:
[...]
coretemp-isa-0000
Adapter: ISA adapter
Core 0:       +27.0°C  (high = +83.0°C, crit = +99.0°C)
Core 1:       +25.0°C  (high = +83.0°C, crit = +99.0°C)
Core 2:       +28.0°C  (high = +83.0°C, crit = +99.0°C)
Core 3:       +26.0°C  (high = +83.0°C, crit = +99.0°C)

jc42-i2c-0-18
Adapter: SMBus I801 adapter at 0400
temp1:        +26.8°C  (low  =  +0.0°C)
                       (high =  +0.0°C, hyst =  -1.5°C)
                       (crit = +68.8°C, hyst = +67.2°C)

jc42-i2c-0-19
Adapter: SMBus I801 adapter at 0400
temp1:        +26.0°C  (low  =  +0.0°C)
                       (high =  +0.0°C, hyst =  -1.5°C)
                       (crit = +69.2°C, hyst = +67.8°C)

jc42-i2c-0-1a
Adapter: SMBus I801 adapter at 0400
temp1:        +26.5°C  (low  =  +0.0°C)
                       (high =  +0.0°C, hyst =  -1.5°C)
                       (crit = +68.8°C, hyst = +67.2°C)

jc42-i2c-0-1b
Adapter: SMBus I801 adapter at 0400
temp1:        +26.5°C  (low  =  +0.0°C)
                       (high =  +0.0°C, hyst =  -1.5°C)
                       (crit = +69.2°C, hyst = +67.8°C)
[...]
Hát itt meglehetősen jobban érzi magát a vas, ahol a processzormagok és egyéb hardverek hőmérséklete alacsonyabb, mint nálam itthon a szoba hőmérséklete. Szívesen beülnék a szerver mellé most. :D
Merevlemezek hőmérsékletének mérése a hddtemp programmal
Lehetőség van külön a merevlemezek hőmérsékletének mérésére is a hddtemp program segítségével.
Telepítés
Telepítsük a programot root-ként az alábbi paranccsal:
apt-get install hddtemp
Hőmérsékleti adatok kiolvasása
Ennél a programnál a kiolvasást is csak root-ként végezhetjük. Futtassuk a hddtemp parancsot, megadva neki paraméterként a megfelelő merevlemez ezközt:
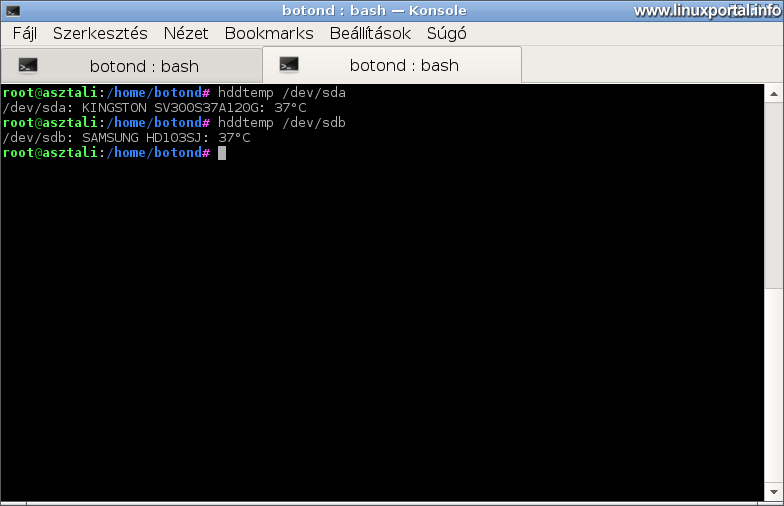
hddtemp /dev/sda
Nálam van egy SSD és egy normál winchester a gépben, így ezekre ezt produkálja:
Ha nem tudjuk pontosan az eszközeink nevét, akkor az alábbi paranccsal tájékozódhatunk a gépben lévő meghajtókról:
fdisk -l
Konklúzió
Ezzel a két egyszerű kis programmal kontroll alatt tarthatjuk számítógépünk hőmérsékletét, és szükség esetén megtehetjük a megfelelő lépéseket, pl. további ventilátor beszerelése a gépbe, gép kifújása, kitisztítása sűrített levegő spray-el, stb.
- A hozzászóláshoz regisztráció és bejelentkezés szükséges
- 378 megtekintés